 Learn how to activate the iPad and sync it using iTunes
AFTER UNBOXING YOUR iPAD, YOU WILL NEED TO
activate it using iTunes running on a desktop or laptop. Ifyou haven't got a computer, Apple Stores should be willing to do the activation foryou, but you're betteroff activating your iPad on your own PC or Mac, because you can then add content and apps From the computer.
The tutorial on page 46 walks you through the process of setting up an iPad. For now, the most important thing to note is that an iPad can only be linked to a single iTunes library, so link it with the computeryou'll most often connect it to. Once you sync the iPad with another library, the content from the new library will replace the corresponding type of content already on the iPad, so you may want to proceed with care.
You'll notice that in the walkthrough, we don't recommend automatically syncing content during set-up. That's simply because doing so can take a very long time. We suggest that having activated your iPad, you then select specific content (iTunes playlists, individual films, certain iPhone apps) to add to it.
Note that when you first check 'Sync Apps', iTunes will try to add them all to your iPad, a process that may take several minutes. Ifyou subsequently want to uncheck all apps, Command-click (Mac) or AltGr-click (Windows) any app in the sort list.
Finally, while you can fill your iPad to the brim, leave some space free (say 0.5-1 GB), because without it larger apps may not update properly later on.
KIT LIST:
■ iPad
■ Desktop or laptop computer with iTunes 9.1 or later
■ Internet connection
Time required : 10 mins
Difficulty : Beginner
Welcome screen
This is what you'll see when you first turn on your iPad. It's telling you to connect the iPad to a PC or Mac with iTunes 9.1 or later.
iTunes is key
Although the iPad is a semi-independent unit, it still requires iTunes on a computer for activation, media transfer, software updates and back-ups
USB docs it
Your iPad's box contains a USB cable. One end connects to the bottom of your iPad and the other to a USB port on your PC or Mae.
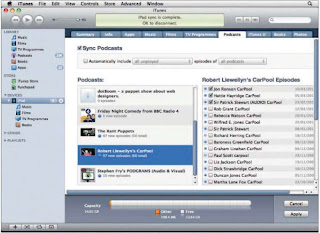
1 Name your iPad Plug your iPad into your computer and you'll be asked to name it. Uncheck all of the checkboxes so you can manually define what to sync. Click 'Done'.
2 Do the initial Sync Your iPad will sync with your library, to which it is now linked. Note the options in the Summary screen, including downsampling of audio ('Convert...') to save space on your iPad.
3 Sync content Tabs Within iTunes provide access to different types of content. Select each in turn, tap the 'Sync' checkbox and define which piaylists, apps, videos or photos you want to sync.
Home screen
By default, your iPad's home screen gives access to 13 apps. These can't be deleted, but you can rearrange them by touching and holding any one until all the icons start jiggling; now drag and drop them as you see fit. Up to six apps can also be stored in the Dock below. To create an additional home screen, drag an app 'off-screen' to the right and it will appear on a new home screen.
By default, your iPad's home screen gives access to 13 apps. These can't be deleted, but you can rearrange them by touching and holding any one until all the icons start jiggling; now drag and drop them as you see fit. Up to six apps can also be stored in the Dock below. To create an additional home screen, drag an app 'off-screen' to the right and it will appear on a new home screen.
4 Start using your iPad Once your sync (or syncs) are done, your content is ready to use on your iPad. In the tutorials that follow, we show you how to use the preinstalled apps and download new ones.


No comments:
Post a Comment