Learn about how to create tables and forms
IF WE TAKE A TERRIFYING TRIP TO THE DISTANT
past (well, 1979), we'd find it was Apple that popularised the spreadsheet. The first example of its type, Dan Bricklin and Bob Frankston's VisiCalc, was first available for the Apple II, and it catapulted the Apple II from being a hobbyist computer to an important tool in business.
In the modern age, Microsoft Excel is the spreadsheet everyone knows, and so it's perhaps fitting that its biggest challenger on the Mac - and the first app in years to really try something new with spreadsheets-is Numbers, part of Apple's iWork suite.
Numbers foriPad retains many of its Mac cousin's best features: it's powerful and easy to use, and it's flexible in terms of layout. Rather than restricting individual sheets to a table with the odd embedded chart, Numbers enables you to place multiple tables within a sheet and add whatever text and images you want.
There's an awful lot to explore with spreadsheet applications, and so for the walkthrough we've decided to lead you through the process of creating a basic table for a list of apps with release dates, prices and ratings. This will enable you to get to grips with resizing a basic table, defining data types for columns and building a form for faster data input.
In the tutorial after this one, we'll showyou how to take a similar table and output calculations and graphs.
KIT LIST:
iPad
■ Numbers for iPad
Time required: 15 mins
Difficulty: Intermediate
Tabbed sheets
Sheets can store multiple tables or a form. To access a sheet, tap its tab. Rearrange tabs by tap-holding and dragging.
Page layout
Numbers shares page layout capabilities with Pages, so you can add images and text alongside tables.
Choice charts
Many different layouts for charts are available if you want something beyond the bog-standard default.
1 New table Tap'New Spreadsheet'and select 'Blank'. Tap the table to select it and tap its table handle (the top-left 'button'). Drag the column handle leftwards until there are only four columns.
2 Fine-tune the table Use the bottom-right drag handle to stretch the table to the width of the page. In the Info menu, tap Table Options' and 'Alternating Rows' to make the table striped.
3 Define headers Tap the'Headers'tab in the Info menu and set 'Header Columns' to zero. The latter step means the leftmost column contains table entries rather than headers.
4 Add your header Double-tap the first header to bring up the keyboard. Type 'App name'. Tap the next header and type 'Price'. Type 'Release date' and 'Rating' in the final two headers.
5 Set column types Double-tap the column bar above 'App name' to select the column. Select 'Format' from the Info menu and double-tap Text'. Similarly, format the second column as 'Currency',
Top table
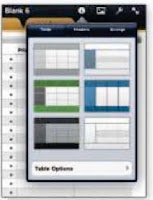
After you've completed your table, you can change the way it looks. Tap the table and select it using the table handle. In the Info menu, select the Table' tab and choose one ofthe layout options. Use Table Options' to further refine your table's visual appearance, including an optional table name row, alternating rows (table stripes), table borders and grid options.
6 Finish column types Select the third columnand set the format to'Date&Time'. From the sub-menu, select a date option and 'None' from Time'. Set the final column's format to 'Star Rating',
7 Create a form Tap the '+' tab and select 'New Form'. Choose 'Table 1' (meaning the table you created) and you get form-based input for your table, with pre-defined field types.
8 Need to reorganise the table?
Select the table and single-tap the column- or row-bar to select a column or row. Tap-hold and drag it to its new position.


No comments:
Post a Comment